Everything is greening up and it is officially my favorite time of the year!
We are planting potatoes, onion sets, spinach seeds, and lettuce seeds in our raised bed this month.
There have been a lot of posts on social media in the past few years about re-growing your vegetable scraps. I’ve never done that, and when it comes to potatoes, you should always purchase certified disease-free potato seed for planting in your gardens or containers.
I purchased two 4-pound bags of seed potatoes for $12, which was entirely too many seed potatoes for my small area (8 square feet), but I wanted two varieties and I will be sharing the extras. Below are the steps for cutting potatoes. You can get many “seeds” from one single potato tuber. It’s important that each piece has at least a few eyes/nodes, which will become the plants. Remember that potatoes are a storage organ of the stem, which has growing points called nodes, so that is why you can divide them and they will grow. Carrots, beets, and radishes, on the other hand, are root cells and do not have nodes on them, so you cannot cut them into pieces and expect them to grow into new plants.
Early potatoes should be seeded 3-5” deep, later season potatoes can be 5-7” (so that they won’t be sunburned). More specifics on growing potatoes can be found here. I want small potatoes for roasting with the skins on, so we planted 4 seeds per 1 square foot in the raised bed, with the intention that I will dig them as I need the space in my succession planting plan. Many early seeded vegetables can be harvested at many different stages (early or later, young leaf lettuce or more mature leaves, young baby beets or larger beets, green spring onions or larger ones, for example).
We seeded 9-16 onion sets per square foot with the hope of thinning them out and eating them as spring green onions and leaving a few to grow larger.
We also added hoops to the raised bed which will support floating row cover to help insulate and protect it from pests, including deer, in the coming weeks. Once it warms up, then I will transition to deer netting over the hoops.
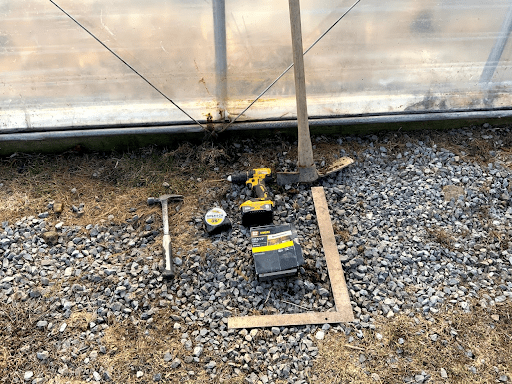
We used ¾-inch, 10-foot long PVC pipes ($2.29 each), six 1-foot rebar pieces pounded into the ground for anchors, nails with plastic washers, and conduit 2-hole straps. The floating row cover ($15 for 7’ x 100’) is only 7 feet wide, but worked out perfectly with the 10-foot long pipe hoops. It’s always so nice when things work out accidentally!
In order to make the cover removable to harvest and care for the plants, on the one side we used 4-foot boards connected to the floating row cover with nails that have plastic washers on them. The weight of the boards will hold the fabric in place (the boards are just hanging there).
We rolled the floating row cover and used a 6” landscape fabric staple to hold it in place, which can be easily pulled and replaced whenever access is needed to the bed.
Hopefully next month we will have some photos to share of the sprouted potatoes, onions, spinach, and lettuce. We also plan to seed some radishes, beets, and turnips in the coming weeks. With the weather warming up, it also will be time to start scouting for insect pests and beneficial critters.
What do you have growing in your garden? Have you harvested anything in 2021? Happy spring gardening!
By Ashley Bodkins, Senior Agent Associate and Master Gardener Coordinator, Garrett County, Maryland, edited by Christa Carignan, Coordinator, Home & Garden Information Center, University of Maryland Extension. See more posts by Ashley and Christa.
The snow is finally melting here in Garrett County and spring is getting warmer every day.
My husband, Josh, had a few hours to help me build our new raised bed on Saturday. Some of you may have read my planning and budgeting blog from last month, but my building materials have changed. Josh found a yellow locust tree to cut into logs, which we sawed on our family’s circular sawmill. Be sure to check local feed stores, garden centers, or local sawmills for wooden building materials that may be very affordable.
Level the area. You will need a shovel and a level. Measure out the dimensions of your raised bed. We had to dig deeper on the one side to make it level. We also used a 4-foot long level, so that made measuring the 8’ x 4’ bed pretty easy to lay out.
Prepare your boards. Square the ends and cut. Pre-drill after cutting the lengths. Pre-drilling is especially important if you’re using hardwood lumber. We used 1.5 inch thick locust lumber.
Lay out your boards and nail them together. Check out this video by Jon Traunfeld (1 minute 30 second mark) for more details on how to nail the boards together. Repeat until your desired height or you run out of materials. Measure diagonally from one end to the other. Those numbers should match if the bed is square.
We added two middle posts that we drove one foot into the ground to be sure that the soil wouldn’t push the boards out of place. Posts were 3” x 4” and 3 feet long.
Secure your layers together.
Add black landscape fabric (or newspaper/cardboard) to block weed growth. This photo shows all posts that were used to secure the three layers of boards.
We used a mixture of bulk topsoil and mushroom compost purchased from a local feed store. Here you can find more information on what you can use to fill your raised bed garden.
Lastly, I used staples, a hammer, twine, and a rule to measure out my square foot plots to prepare for planting. I have 32 square feet ready to plant as soon as the weather warms up a little more. Check out these great resources if you need guidance on timing of when to start planting vegetables. This planting calendar is my favorite planning tool. Next month, I’ll share some ideas for critter-proofing the raised bed.
Are you ready for vegetable gardening season? Do you have plans to add any gardening spaces this season?
By Ashley Bodkins, Senior Agent Associate and Master Gardener Coordinator, Garrett County, Maryland, edited by Christa Carignan, Coordinator, Home & Garden Information Center, University of Maryland Extension. See more posts by Ashley and Christa.
One of the most common pieces of advice I give out is to plant flowers in your vegetable garden. Blooming flowers are a big draw to many beneficial insects, including pollinating insects such as bees and butterflies, and predators and parasitoids like the tiny wasps who help to keep pest insects under control in your garden. Plus, flowers are pretty, you can cut them to bring inside, many of them smell nice; they are just pleasant to be around.
To attract a good range of beneficials, it’s best to have something blooming in or around your garden all season long, and a wide range of flower types and sizes is also good. From giant sunflowers to tiny forget-me-not or alyssum, if you see bees on it, it’s good to have around. But sometimes we forget that herbs are also flowering plants—we plant them for a burst of flavor in the kitchen, but don’t consider their other qualities, including as a source of nectar for flying insects. Some herbs have flowers that are great in size and shape for butterflies to visit, many attract bees, and those with the tiniest flowers bring in those useful little wasps. So when you’re planning what flowers to plant in your garden, consider adding more culinary herbs as well, and let them do double duty.
Even though it is snowing again today, I am dreaming of gardening season and I am working on a budget for a new raised bed garden that will be 8’ x 4’ x 12”. I have always grown vegetables in a traditional in-ground garden, which only requires some tools for preparing the soil, soil amendments, and a suitable location (full sun with good soil). However, I want the advantages of a raised bed:
earlier soil warming;
more focused usage of growing space (through succession planting and square foot gardening techniques);
less body bending to plant, maintain, and harvest; and
getting to plant cole crops sooner (with my in-ground garden, I have to wait until late May for the ground to be unfrozen and dry enough to run the the tractor tiller).
Raised bed made from grapevines and a plastic liner.
A lot of inspiration can be found on the internet for building materials, but think about materials that you may already have on hand or something you can find freely or cheaply. More information on raised beds can be found on the University of Maryland Extension website.
Some things to keep in mind:
Natural materials (stones, logs, untreated lumber, cement blocks, sawmill slabs, bricks, etc.) are safe, affordable, and often can be scavenged/repurposed if you aren’t afraid to ask or do some physical labor.
What is your skill set? Maybe you can work out a trade with someone who can help you build the raised bed.
Any time you can buy items in bulk, you will save money.
After doing some research, I plan to purchase new pine lumber from a local box store (easy to find and within my budget). Pine or softwood lumber should last anywhere from 3-5 years. Using commonly available sizes/dimensions, I will be spending approximately $80 (if it lasts 3 years, that’s $27 a year). Cedar boards would cost double the money but they could last closer to 15 years (cedar was out of stock in a lot of locations I checked).
Most stores that sell lumber will cut the lumber for no extra fee. It is sometimes cheaper to buy a longer board and have it cut into smaller pieces for transport. Be sure to plan ahead.
The most expensive part of creating this garden will be the topsoil, since I don’t have any extra in my landscape to use. The soil is an investment and will be a resource that I can use for many years to come to produce nutritious fruits and vegetables.
I used a free cubic feet calculator to figure out an estimate of how much soil I will have to purchase for my 8’ x 4’ x 12” garden. See the calculations below.
Soil is expensive and hard to transport and handle. I am prepared to do this step over the course of several days or have some people help me. Bagged topsoil usually isn’t the best quality and can add a lot of expense, but the source can be traced if any issue should arise, and also gives anyone with access to any vehicle type/transportation the ability to create a garden. Bulk topsoil and compost is usually sold by the ton or cubic yard, so the free calculators are helpful for figuring out amounts needed. Soil testing is recommended for raised bed gardens.
Soil Type
Price
Bagged Topsoil (43 bags of 0.75 cu foot)
$110
2/3 bagged topsoil, 1/3 bagged compost (45 bags)
$145
Bulk topsoil/compost
$65
The bottom line is that the raised bed could cost up to $225 depending on which option I use for soil. Using bagged soil/compost mixed ($145 + $80 lumber) is going to cost the most $225. If I use the bulk topsoil/compost option and use my own farm truck to haul it, it’s only $145. I’ve also budgeted an additional $40 for a 7ft deer fence and landscape fabric. For my family of 4, I am willing to count this raised bed garden as a worthwhile investment of time and money.
By Ashley Bodkins, Senior Agent Associate and Master Gardener Coordinator, Garrett County, Maryland, edited by Christa Carignan, Coordinator, Home & Garden Information Center, University of Maryland Extension. See more posts by Ashley and Christa.
I hope all of you are busy planning your vegetable gardens and getting those seeds ordered! If you haven’t purchased seeds yet, now is the time. A lot of seed companies are experiencing larger than usual interest and several have had to temporarily stop accepting orders. Many varieties of seeds are running out. So jump on it!
If you already have your seeds and your plan of action, you may be champing at the bit to get started. Those of us who start seeds indoors feel the urge to play in the dirt (or the soilless seed-starting mix) even in winter, but it’s often not a good idea. When I began gardening, I started many plants far too early, and was sorry later when I had enormous seedlings that couldn’t be put in the ground until the weather cooperated. So as a former offender, I will state clearly: DO NOT START YOUR TOMATO PLANTS IN FEBRUARY. In fact, do not start your tomato plants until late March or early April, and you will be much happier, and so will your plants.
But what CAN I start, you ask, with a pitiful, yearning look in your eyes. I know. I really do. Here’s a list. It may not include anything you’re actually planning to grow, but I’ll give you another suggestion at the end. Here we go.
Hi all! It’s time for check-in #3 on my summer gardening efforts. Overall, things are going well, but there have been big ups and downs.
The new raised bed we built is doing well. Krysten planted corn in the center one, and a couple cucumber seedlings in the rightmost one. The cucumbers have been slow to develop and grow. I think this is because of the extreme heat. In the last week or two, one’s growth has accelerated and it’s finally growing one nice cucumber. I may harvest it and slice it up to use as an ingredient in a nice summer cocktail drink tonight (It’s Friday as I write this draft!). Do a web search for “porch swing” cocktail recipes.
Corn
Cucumber is growing!
Since we got the fencing up that encloses the whole space, we have had 0 evidence of animals munching our crops! Huzzah! However, we DID see one deer in our yard and it was eating our hostas elsewhere on our property (and has continued to; the hostas are mostly gone now). So, we DO have deer, but they haven’t been interested in our vegetables (yet). I wonder if they don’t like walking on the gravel we have down?
Tomatoes
We have been harvesting a lot of tomatoes! One of our plants grew very large and tall and ended up flopping over the tomato cages we built in the last update. We needed something taller! We were worried that the tropical storm in the first week of August was about to topple the biggest one completely, so we hurriedly built an extension. We found some scrap wood in the garage, attached it vertically to the sides of the raised bed, and strung twine around nails in the boards back and forth from board to board. This seems to hold it up well and while the tropical storm wasn’t too bad here, there was no damage afterward. We need to do the same for our second largest one this weekend.
Taller tomato support
The early blight issue I spoke about in the last update has seemed to be controlled by pruning more heavily and keeping air flowing. However, our smaller tomato plant has been slow to fruit and has some holes/spots on the leaves. After perusing the HGIC site, my guess was that it was Septoria leaf spot which is a fungal disease, however as a couple knowledgeable HGIC coworkers proof-read this post, they said it was actually most likely from flea beetles. It may sound like I’ve got the inside connection with experts, but everyone can send in questions to our Certified Professional Horticulturists for help like this!
Flea beetle damage on my tomato plant
There are prevention and control directions on the HGIC page for flea beetles, but since the damage isn’t large at the moment, I think we’ll leave it as-is now, and plan to clean up and remove garden debris to reduce overwintering sites for the beetles when we wind down the growing season this year.
Overall though, we’ve been harvesting more tomatoes than we know what to do with, so we’re happy with our tomato efforts here! I’m considering making a whole lot of sauce.
Tomato harvest
Squash and zucchini
In the last update, I mentioned I suspected squash vine borer larvae to be killing my zucchini plant from the inside. I did the surgery and discovered I was right.
See the white larvae in the center, lower third of the image?
I remember reading on the HGIC site at some point that in general with cucurbits, you can cover parts of the plant that grow above the soil with soil, and they will begin to root. I cut the plant to disconnect the borer-infested segment (which was pretty much down into the roots) from the good parts. I ripped out the roots and infested stuff, then planted the remaining stuff back in, mounding soil over it.
Main zucchini plant disconnected from infected portion of plant.
Re-planted zucchini
For a few weeks, things seemed promising. Most of the large leaves did not make it, but some younger and new leaf sprouts were growing strong, and a small fruit started growing. This suggested to me that after some time, we’d likely have this zucchini plant back from the dead and producing again. However, that little fruit died and rotted, and the leaves and stems suddenly showed damage.
Zucchini plant is not doing well
Zucchini leaf with what looks like Downy Mildew
Our squash had been doing great. It kept producing great fruit at a rapid pace, and kept expanding. It was healthy; not showing damage from squash vine borers or cucumber beetles like the zucchini had. It expanded outside of the raised bed and sometimes those leaves would appear wilted. We assumed it was because of the extra heat from the gravel and the hot sun.
All was going well until a few days ago – it began wilting everywhere and wasn’t recovering. Fruit production stopped. We took a closer look, and we’re seeing the same squash vine borer type damage we saw with the zucchini! Noooo! It looked pervasive. I wasn’t about to do more larvae extraction (it was gross, and squash isn’t my favorite vegetable).
So, we called it on both the zucchini and the squash plants. 2:35 pm, Friday, August 10th, 2020. We ripped them out and tossed them far from the garden. We’re making space for some sort of cooler season crops (the planning hasn’t started yet).
Zucchini plant has been pulled and the squash plant is next.
Wilted portion of squash plant outside of raised bed
There are likely squash vine borer larvae in there
There are likely squash vine borer larvae in there
There are likely squash vine borer larvae in there
To prevent egg-laying, wrap a collar of aluminum foil around lower stems or dust or spray lower stems with spinosad or pyrethrum.
Cover plants with floating row cover until flowering.
Plant early to lessen injury. Use transplants instead of seeds. Or, plant squash seed mid-June.
Butternut and cushaw are resistant; yellow crookneck less susceptible than zucchini.
Green beans
We’ve been harvesting a few green beans from the mature plants that survived the rodent massacres that happened before we got the fence up, but it wasn’t enough to make a meal out of. Several weeks ago, I planted more seeds to replace the eaten ones and those have grown and should be fruiting soon. I hope that we can have some dinners with roasted green beans soon; they are my favorite of our garden veggies after tomatoes (and since tomatoes are fruit, I could say that green beans are my favorite veggies).
The zinnia we planted in the center of the green beans has gotten large and is crowding them. We will likely try to tie it up to keep it more vertical than horizontal.
There are a couple bean leaves with holes munched out of them from some insect, but nothing to be too concerned about yet.
Our zinnia and green bean bed. Heavy on the zinnia.
Some beans available for picking
Minor insect damage on bean leaves.
Moving forward
We’re still having fun with the garden. It’s great to be done building for the most part. Krysten has been adding a few pots on the outskirts with flowers in them which makes the space look nice. I think in the next season, we’ll probably add more flowers in pots and save the beds for the vegetables. The flowers have overcrowded vegetables in some instances in the raised beds, and we should be able to attract pollinators close enough to the vegetables via potted flowers.
I’m looking forward to more tomatoes and our first meal with green beans. Perhaps in the next update, I may present our plan for cool-season crops.
Welcome to the ranks of Maryland food gardeners. We live in every zip code and grow food in buckets on rooftops, in community garden plots, in front and back yards, and in large rural gardens. Rest assured, you will sweat and toil, learn a ton, have fun, and put delicious, fresh food on the table. You probably have hopes and dreams for your new garden, and that is great. But you also need to adjust your expectations to realities, notably Mother Nature.
For a variety of reasons, your crops will not always resemble those pictured in seed catalogs (you may even come to believe you are growing an entirely different plant species). You will learn that “doing everything right” doesn’t guarantee success with every crop, every year. Insect pests, diseases, or a little neglect at the wrong time, will reduce productivity, create teachable moments, and increase your respect for farmers.
Are there “best beginner crops”?
Bush bean, tomato, cucumber, pepper, summer squash, and leafy greens (lettuce, arugula, Swiss chard, kale, mustard, etc.) are good starter crops, although they have their share of pest problems. (You will need to grow or buy tomato and pepper transplants; seeds of the other crops can be planted directly in garden soil.) Other crops may be more challenging. For example, they may require more room, such as winter squash and sweet potato, or a more permanent space, like asparagus and horseradish (perennials that live year-to-year).
It is always a safe bet to start small and plant what you like to eat and have the space and time to grow.
What to expect in terms of appearance and growth?
First, learn about each crop you plan to grow- its appearance, mature size, growth habit, requirements for sunlight, water, and nutrients, and major pest problems. If you give your plants what they need you can match or exceed the per plant yields of nearby farmers!
In general, be prepared to accept some level of injury and imperfection. You will see leaves with some spots, holes, or brown edges, on even on the healthiest plants. That’s ok- you probably don’t need to worry or take action, other than continue to monitor plants.
Beetles chewed holes in these bean leaves but the damage can be ignored; it will not reduce the harvest from these healthy plants.
Vegetable plant problems are often blamed on insects and diseases, but can more often be traced to weather extremes, compacted or infertile soil, weeds, human neglect, or lack of sunlight or room to grow. Improving the soil with 2-4 inches of compost will go a long way to ensuring healthy plants.
Variable spring weather (high wind, wide temperature swings, periods of cool, wet weather) can beat up tender seedlings, especially transplants that led a pampered early life in a greenhouse or basement. Healthy plants will grow out of the injury.
Cold temperature injury to tomato leaf
In March and April, you may also find that seeds don’t germinate or seedlings just “sit there” due to low soil temperature. Check the soil temperature requirements for your spring crops and enter your zip code in this app to see if your soil is warm enough.
Find out when to expect the last frost and first frost.
Unless you are very lucky (or live far away from other vegetable gardens and farms), expect to encounter an array of insect pests and disease problems. We have information and techniques to help you prevent problems, such as selecting disease-resistant cultivars, spacing plants for good air circulation, handpicking pest insects, planting to attract beneficial insects, and excluding pests with fences and floating row covers.
When do I start harvesting? When should I remove plants?
Most vegetable crops are either annuals or biennials. With annuals, like bean, tomato, and cucumber, seeds germinate, and plants grow, flower, fruit, and die during one growing season. Biennials, like beet, kale, and carrot, have a two-year life cycle but are treated as annuals in most Maryland gardens. In either case, even well-grown crops do not live and produce forever!
This productive Tuscan kale plant is showing the wear and tear of a long growing season. Caterpillars have chewed some holes and the oldest leaves are beginning to yellow and die.
HGIC has information on harvesting 33 different vegetables. For fruiting crops, like bean, cucumber, and eggplant, pick fruits before they reach full-size to encourage continued flower and fruit development. Allowing seeds to mature inside fruits will signal the plant that it has accomplished its reproductive mission and can slow down and die.
Some first-time gardeners are surprised and disappointed that their vegetable plants “play out” over time, declining in vigor, quality, and productivity over time. This is natural and varies by crop, cultivar, and growing conditions. For example, leaf lettuce from a single spring planting may be harvested for two weeks or so before it becomes bitter or starts to produce flower stalks.
Root crops, like radish, beet, and onion, are usually harvested just a few times, since one planting will mature at roughly the same time. Summer squash and cucumber fruits are typically harvested for 3-6 weeks before insect and disease problems reduce plant vigor and fruit production.
A 10 ft. row of bush beans will produce 4-8 lbs. of beans over a 2-3 week period. Pole beans require some type of support but can produce beans for many weeks, far out-yielding bush beans. Tomato, pepper, and eggplant produce fruits from mid-summer until the first frost, although fruit quality declines after September.
‘Fortex’ pole bean can produce high yields over a long harvesting season.
Pull out plants when they are declining due to age or significant injury by insect pests, diseases, storms, wildlife, etc. and re-plant the area. The same holds true for undersize plants that languish for weeks without making much growth. There is really no such thing as emergency plant care. Pull them out and try to figure out what happened and learn from it so you can succeed the next time.
Good luck, new gardening friends. We are here to help and take care of each other and our planet.
By Jon Traunfeld, Extension Specialist. Read more by Jon.